CATEYE PADRONE SMART +
Setup Flowchart
2. Checking package contents
3. Install Cateye Cycling™
4. Pairing a smart computer with a smartphone
5. Pairing a sensor or a Shimano DI2 system with a smartphone (If you have sensors or a DI2 system)
You can connect the DI2 system and sensors compatible with Bluetooth to a smart computer. Pair it with optional accessories or commercial sensors as required.
Important
• Pair all sensors and similar devices that you intend to connect.
• Pairing a Shimano DI2 system must be performed using a smartphone according to the procedure below. A wireless unit (Shimano EW-WU101, EW-WU111, SC-M9051, or SC-MT800) is required separately for pairing.
• When using an iPhone, you cannot sync settings of commercial sensors.
When measuring in Sensor Direct Mode, it is necessary to configure sensor settings separately via smart computer.
![]() 1. Switching to Sensor Direct Mode
1. Switching to Sensor Direct Mode
Smartphone
1. Verify that [Connect] is set to ON in the ![]() (MENU), and then tap [Device].
(MENU), and then tap [Device].
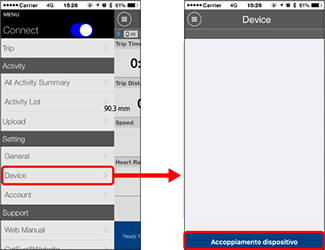
Tap [Pair to Device] to start pairing.
2. Activate the sensor or the DI2 system.
![]() Activating the sensor or the DI2 system
Activating the sensor or the DI2 system
When Cateye Cycling™ detects the signal from the sensor or the DI2 system, a message is displayed on the smartphone.
Tap [Pair]. The synchronized sensor is displayed on the [Device] screen and pairing is completed.
* When pairing a sensor or a DI2 system with Cateye Cycling™, an "A" is displayed after the sensor name.
3. Set the tire circumference for a sensor capable of speed measurement.
* If you have not paired a sensor capable of speed measurement, this step is not required.
Tap [Device], and then tap [Sensor name] > [Tire Circumference] (the length of the outer circumference of the tire).
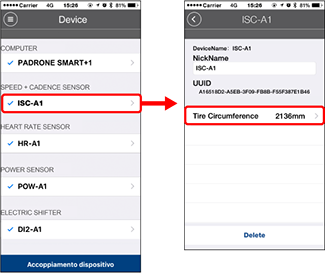
Select the tire circumference according to the tire size written on the side of the tire.
![]() Determining tire circumference
Determining tire circumference
* Default value: 2096 mm (700x23c)
* Requires to set tire circumference for each sensor.
* You can also change device names and cancel pairing from this screen.
4. Set the DI2 system switch control and gear information.
* If you have not paired a DI2 system, this step is not required.
Tap [Device], and then tap [DI2].
Change the DI2 system settings as necessary.
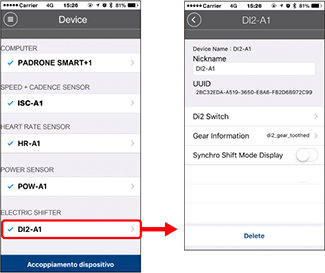
• Switch Configuration
Uses the DI2 system switch to operate a smart computer.
![]() Changing the switch settings
Changing the switch settings
• Gear Information
Select [Number of Teeth] or [Gear Ratio] for the gear information displayed on the measurement screen.
• Synchro Shift Mode Display
You can display the synchro mode on the measurement screen.
* When you turn on synchro shift mode, the incoming notification icon is not displayed.
* You can also change device names and cancel pairing from this screen.
Sensor pairing is now complete.
* If you want to pair another sensor, repeat the same procedure again.
Important
• Cadence, heart rate, and power data, and DI2 system gear information will not be displayed under the initial configuration. Change the measurement screen to be able to display measured values and gear information from paired sensors.
![]() Changing the measurement screen
Changing the measurement screen
• If settings changed for the DI2 are not applied to the smart computer, or if the smart computer does not operate properly, format the smart computer.
See “Abnormal display: General” under “Frequently Asked Questions” for details.
6. Mounting the bracket
7. Mounting the speed (cadence) sensor (ISC-12)
(Optional)
8. Wearing the heart rate sensor (HR-12)
(Optional)
Usage Instructions