CATEYE PADRONE SMART
CATEYE STRADA SMART
Setup without smartphone
Setup
Set up smart computer according to the procedure below when using it for the first time.
Button operation
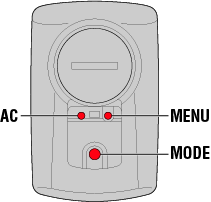
Check button locations before starting set up.
Padrone Smart
Back
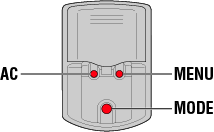
Strada Smart
Back
Remove the battery insulation sheet from the smart computer.
After removing the battery insulation sheet, return the battery cover to its previous location.
* If characters are lit on the LCD screen, you can use the product as is.
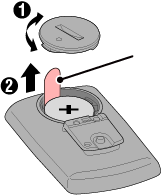 Insulation sheetPadrone SmartCloseOpen
 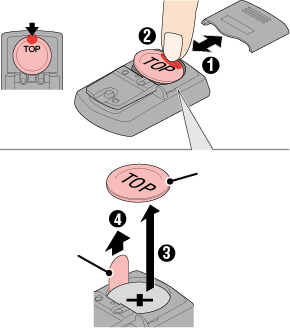 Insulation sheetStrada SmartPressSlideWaterproof inner cap
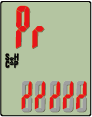
1. Format (initialize) smart computer.
Caution
All data will be deleted and smart computer will be reset to factory default settings.
While holding down the MENU button on smart computer, press the AC button.
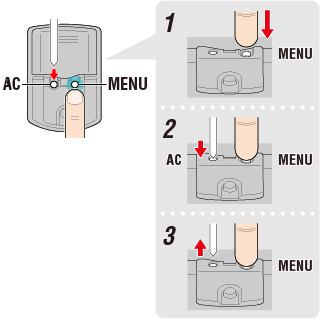
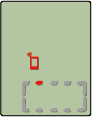
The whole display turns on and then switches to the smartphone search screen.
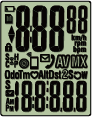
Whole display turns on
Smartphone search
screen
Press MENU to proceed to the next step.
![]()
* If smart computer switches to the measurement screen without the whole screen turning on, it has not been formatted. Redo the procedure.
2. Display the desired measurement unit.
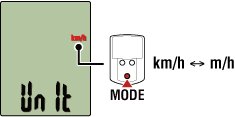
Press MENU to proceed to the next step.
![]()
3. Pair a sensor.
Smart computer can be used with sensors compatible with Bluetooth. Pair it with optional accessories or third party sensors as required.
Important
• Pairing must be performed in order to use a sensor.
• Avoid pairing sensors at a race venue or in similar locations where there are many other users. Doing so may cause smart computer to be paired with another device.
• Perform pairing with all sensors and other devices that you want to connect.
• When using while connected to the Cateye Cycling™ app, perform pairing using Cateye Cycling™.
When the Cateye Cycling™ app is connected and there is pairing information in Cateye Cycling™, the information in the smart computer is replaced by the Cateye Cycling™ pairing information.
![]() Smartphone : Pairing with a sensor
Smartphone : Pairing with a sensor
Activate the sensor that you want to pair.
* For the CATEYE sensor signal activation procedure, refer to the sensor’s online manual.
Ready for synchronization

Sensor activated
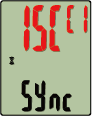
Synchronization complete
The synchronized sensor is displayed on the top of the screen and pairing is completed.
• SP : Speed sensor
• ISC : Speed/cadence sensor
• CD : Cadence sensor
• HR : Heart rate sensor
• PW : Power sensor
* When pairing a sensor with a smart computer, a "C" is displayed after the sensor name.
* To pair another sensor, press MODE for 2 seconds to return to the synchronization standby screen, and repeat the same procedure.
*If pairing is not successful and you cannot proceed to the next step, press MENU to skip pairing. After setup is complete, retry pairing again from the menu screen.
Press MENU to proceed to the next step.
![]()
4. Enter the tire circumference.
* If you have not paired with a sensor capable of speed measurement, this step is not required.
Enter the circumference in mm of the tire (the length of the outer circumference of the tire) on which the sensor is installed.
(Setting range: 0100 – 3999 mm)
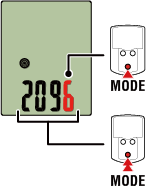
Increase number
Move to next digit
(2 seconds)
* Error is displayed if values outside the setting range are entered.
* If multiple sensors capable of speed measurement have been paired, set the tire circumference for each of the remaining sensors from the menu screen after setup.
Press MENU to proceed to the next step.
![]()
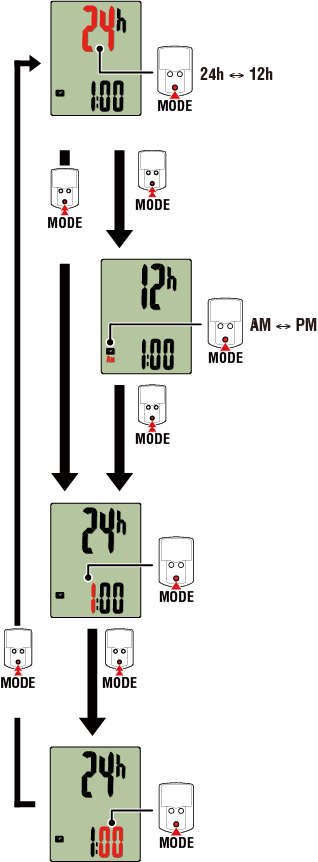
5. Set the time display mode and the time.
(2 seconds)
Time display mode
Hours
Minutes
AM/PM
(2 seconds)
Select 24 h
Select 12 h
(2 seconds)
Increase number
Increase number
(2 seconds)
(2 seconds)
Pressing MENU switches to the measurement screen.
![]()
Setup is now complete.
* Once pairing is completed, mount the sensors on the bicycle or on the body according to the individual sensor’s instruction manual. For the procedures of CATEYE sensor mounting and use, refer to the sensor’s online manual.